

How to Replace a Light Switch
Learn how to replace a light switch safely. Beyond wiring, discover how new switches elevate the look & feel of your chandeliers and home lighting.
How to Replace a Light Switch | Safe DIY + Style Upgrade for Your Home Lighting
Every DIY blog tells you replacing a light switch is "a fast 15-minute job".
But almost none mention this: the switch is the silent partner of your lighting. A grimy, yellowed, wobbly old wall switch can drag down even your most beautiful chandelier.
Changing it is not only about fixing a broken click. It is a tiny, low-cost renovation that makes your whole lighting system feel intentional, modern and polished.
This guide walks you through safe switch replacement. We will cover wiring basics, dangerous mistakes most beginners make, and how to pick a switch that matches your new pendant lights, chandeliers and wall sconces.
Disclaimer: Electrical work carries risks. Stop and hire a licensed electrician if you feel uncertain. Local electrical codes vary.
Table of Contents
1. Before you start: Know when DIY is OK & when to call an electrician
2. Tools you need (the non-negotiable safety item most people skip)
3. Step-by-step: How to replace a single-pole light switch
4. The 4 biggest DIY mistakes (electricians see these every week)
5. Style upgrade: Match switches to your chandelier & room aesthetic
6. FAQ
1、Before you start: DIY or call an electrician?
Safe to try DIY:
1、 Standard single-pole switch (one switch controls one light)
2、The box is dry, no burning smell, no melted/discoloured wires
3、The old switch just feels loose, or clicks poorly
STOP. Call electrician immediately if:
1、You see burnt wires, black marks, melting plastic or smell burning
2、Your house has old knob-and-tube wiring
3、It is a 3-way / 4-way switch and you have zero electrical experience
4、The wall box is cracked, overstuffed with wires
5、You are nervous at any point. No shame here. Safety first.
2、Tools list
1、Non-contact voltage tester (1 mandatory tool, do not skip)
2、Screwdriver set
3、Phone (to take photos of original wiring before disconnecting wires)
4、Electrical tape
5、New light switch + wall plate
6、Work gloves
3、Step-by-step guide
1. Cut power & verify power is dead
Go to your circuit breaker, flip off the corresponding circuit. Tape the breaker shut so no one flips it back on.Use your non-contact voltage tester to test the wires inside the box.
Rule: A light being OFF does NOT mean no power. Mislabeled breakers are extremely common. If tester beeps, power is still live — do NOT touch wires.
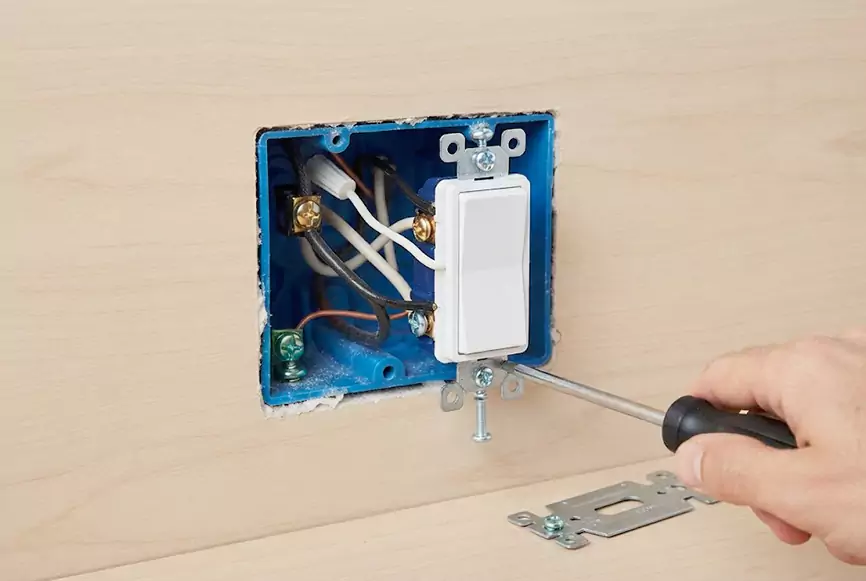
2. Remove cover plate & pull out the old switch
Unscrew the wall plate, then the two mounting screws holding the switch into the electrical box. Gently pull the switch outward to expose all wires.
Take clear photos of every wire connection before disconnecting anything. This photo saves you from wiring confusion later.
3. Disconnect wires
Loosen the terminal screws and release the wires.
1、Bare copper/green wire = Ground wire
2、Black wire = Hot wire
Note: Never rely only on wire colour rules — always reference your photo.
4. Wire your new switch
Reconnect wires exactly the same way your photo shows.Ground wire connects to the green screw on the new switch.Wrap wires clockwise around screw terminals, then tighten gently.
Pro tip: Avoid push-in backstab holes. They loosen over time and create fire hazards. Use side screw terminals.
5. Tuck wires, mount switch & plate
Fold wires neatly like an accordion and gently push them back into the box. Do NOT force or cram wires tightly.Screw the new switch straight and flush. Attach the wall plate.
6. Restore power and test
Head back to the breaker, turn power back on. Flip your new switch multiple times. Check if your light turns on and off reliably.
4、4 Biggest DIY Mistakes Homeowners Make
1. Skipping voltage testing. The 1 cause of shocks.
2. Losing track of wiring (this is why the photo rule exists).
3. Over-tightening screws: cracks plate, damages wire insulation.
4. Ignoring ground wire: critical protection against shock risk.
5、Style Upgrade: Match Switches To Your Room Lighting
Even if you select premium brass chandeliers, wall sconces or table lamps, cheap off-white plastic wall switches can downgrade the whole aesthetic of your room. “The wall switch plate is an easily overlooked detail of your full lighting scheme, as it controls all fixtures on this circuit.”
1、Brushed brass / gold switches: Pair perfectly with brass chandeliers and brass wall sconces, ideal for modern luxury and warm-toned interiors, matching the metal finish of your lighting hardware;
2、Matte charcoal blue switches: Great for moody dark walls and low-saturation quiet spaces;
3、Matte chocolate brown switches: Work beautifully with wood finishes for warm, vintage lighting schemes;
4、Matte black rocker switches: A versatile option, matching black metal & dark bronze light fixtures. Perfect for minimalist industrial style and modern black-white-grey interiors with crisp clean lines.
Even when your light fixtures work perfectly, dated off-white plastic switches break the cohesive design. Choosing switch plates that match the finish and tone of your lighting hardware completes the whole lighting aesthetic of your room.
FAQ
Q: Can I replace a regular switch with a dimmer for my chandelier?
A: Yes, but confirm your chandelier bulbs are dimmer-compatible. Wrong dimmers lead to flickering lights.
Q: What is the difference between single-pole and 3-way switches?
A: Single-pole: One switch controls one light. 3-way: Two switches control one light (top & bottom of stairs). They cannot swap directly.
Q: My old switch has no ground wire. Can I still install a new switch?
A: Check local building codes. You may need a GFCI or hire an electrician.
Closing
Replacing a light switch is more than fixing a broken part. It is a tiny detail that completes your lighting design.
Once your new switch clicks smoothly, take a second to look at your chandelier. Suddenly the whole room feels finished.
If you are upgrading your lighting at the same time, explore our collection of modern luxury chandeliers.